3D
Projects
Auto Desk Maya
TITLE: Maya Character Walk Cycle
YOUR ROLE: Director/Lead Animator
MEDIA: 3D Animation
SOFTWARE: Autodesk Maya
DURATION: 1:32
CLASS: 3D Modelling And Animation
PROFESSOR: Rodney Florencio Da Costa
SEMESTER / TERM: FA 25
INSTITUTION: Clemson University
DESCRIPTION: The second and final animation project I completed for my 3D Modelling and Animation class was, similar to the University of Tampa's, a walk cycle. This time however, the goal was to create a walk cycle that had personality in it. In my case, I decided my character's walk cycle would have swagger to it, like the person was hyped up. My approach saw me use a walk cycle chart identical to that which I based my UT walk cycle on to get the proper motions and timing right, I knew I had to get the walk correct before I could adjust it. I only animated the legs, pelvis and head when doing this, I did not animate the arms at all nor the torso. Both would be where the personality of the cycle came through when I went to add it, which I did by raising the shoulders up, bringing the arms in, and twisting the torso in the direction of the arm going forwards opposite to whichever leg was going forwards. I paid very close attention to each part of the body that was moving and had each part react to each other, whether that was the shoulder blades stretching when the arms moved forwards, the pelvis twisting with each leg, or the neck bobbing with the head. Acting out the cycle for myself gave me a good understanding of not only the timing of all of these elements, but also the poses that I'd need to recreate.


TITLE: Maya Object Animation
YOUR ROLE: Director/Lead Animator
MEDIA: 3D Animation
SOFTWARE: Autodesk Maya
DURATION: 1:32
CLASS: 3D Modelling And Animation
PROFESSOR: Rodney Florencio Da Costa
SEMESTER / TERM: FA 25
INSTITUTION: Clemson University
DESCRIPTION: For the latter half of my 3D Modelling and Animation class at Clemson University, we were introduced to object animation first as a means of learning the Maya animation interface. This interface was nothing new to me as my UT work below shows, but this was the first time I was animating objects rather than a character. My animations were fairly straightforward because of that, being one ball bounce and one pendulum swing, plus my own animation where my ball navigates an obstacle course. The first two animations saw me lean more towards the exaggerated sides of their motions, I made their respective movements rather noticeable. The ball for the bounce squashes and stretches quite drastically while the pendulum swings in a very drawn out manner. For the obstacle course animation, I followed a similar approach while implementing some character into the ball itself. I wanted to make it appear curious, playful and in some instances brave, using the obstacles and its approaches to showcase those characteristics.

Unreal Engine 5
TITLE: All The Second Chances
YOUR ROLE: Director/Lead Animator
MEDIA: 3D Animation
SOFTWARE: Unreal Engine 5
DURATION: 2:04
CLASS: Animation for Interactivity and Games
PROFESSOR: Stephen Dinehart
SEMESTER / TERM: FA 23
INSTITUTION: University of Tampa
DESCRIPTION: As part of my final for both the Unreal Engine tutorials and my Interactivity And Games class, we were to design a hypothetical game that would use UE. This game culminated into a trailer showcasing potential gameplay or story aspects of our game, done as a render similar to the above sequence project. For my game, I selected a short story written by my brother for one of his graduate classes, "All The Second Chances You'll Ever Have.". The story is about the invention of multi-universal travel, and how some have made it a service where people can leave their dimension and take on the lives of their alternate; hence the second chances. My game version would focus on a man who has lost his memory and uses the technology to travel different realities, attempting to piece together where he's come from and why he's strayed so far from his universe. My project is notable for it's use of the Metahuman add-on for Unreal Engine, since it allowed me to not only create a pre-rigged model of this main character, but also make two different versions of him: a clean, past version and a disheveled present version of him. I did a good bit more character animation with him too than the above sequence, trying to tell a story without dialogue that presents the immediate question of the game while leaving plenty of mysteries in the air as well.

TITLE: Living Space
YOUR ROLE: Director/Lead Designer
MEDIA: 3D Modelling
SOFTWARE: Unreal Engine 5
CLASS: Virtual Production
PROFESSOR: Gregg Perkins
SEMESTER / TERM: FA 24
INSTITUTION: University of Tampa
DESCRIPTION: Since much of the focus of my Virtual Production course was on creating believable environments within Unreal Engine, one of our projects focused on creating a living space with a fully modelled exterior and interior. For my project, I took inspiration from some of my favorite games such as Half Life 2, S.T.A.L.K.E.R. and the Metro series to create a warehouse set in a post-Soviet environment. While much of the surroundings of the skybox would be premade models, I fully modelled out the warehouse itself using brushes and a handful of decorative models for sections like windows, doors, AC units, vents, etc. The latter helped in making the environment feel more built up in it's construction rather than a square box with no supports or other notable details. I also opted to make the warehouse abandoned to really add as many details as I could, scattering props across it's interior rooms to show what it was once used for while making new landmarks out of them. The bump maps of the textures I used really helped with selling that this warehouse, which I modelled off a reference image, wasn't just a bunch of cubes with textures slapped onto them, since it made those brushes feel a lot more cohesive when combined with the modelled props.

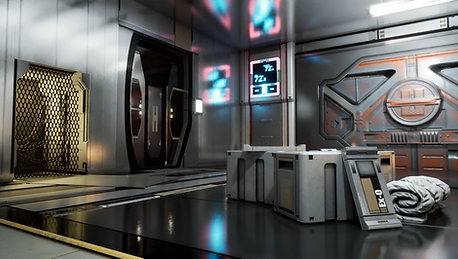
TITLE: Immersive Space
YOUR ROLE: Director/Lead Designer
MEDIA: 3D Modelling
SOFTWARE: Unreal Engine 5
CLASS: Virtual Production
PROFESSOR: Gregg Perkins
SEMESTER / TERM: FA 24
INSTITUTION: University of Tampa
DESCRIPTION: As I said above, the goal of our Virtual Production class was to create immersive spaces, and naturally this was the focus of our final project. The premise was simple, create as realistic and believable of an environment as we could. I decided my environment would be one set in the far future, on a Mars-like planet. I wanted to make an environment that was interesting, but could also be rendered in as realistic of a manner as possible. To do this, I gathered a variety of sci-fi prop and model packs from the Unreal Engine market, ones specifically designed to create such environments. Their modularity made this goal both helpful and challenging as I hadn't quite thought out how I was going to design the environment, I only had a vague idea in my mind. So instead, I opted to experiment and see what were in the packs, building out my scene gradually. Certain props like the round desk, curved windows, interior wall details and large bulkhead doors caught my eye and thus were incorporated into the scene as major landmarks, which I'd then build out the rest of the scene around. When it came to the outside landscape, I very crudely used the landscaping tool to make a mountainous landscape and then used prefabricated structure models, shrunken down to give a false sense of scale, to populate the exterior. I also positioned the sky light of the scene to be pointing through the window so the light would bounce off the metal textures of the panels, clashing with the cool, white lights I had placed sparingly across the scene. This left me with the result on the right, cleanly rendered from five different angles.


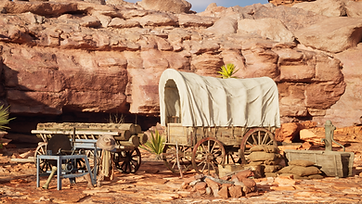
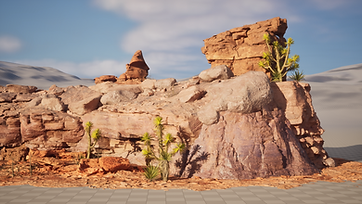
TITLE: Snowglobe Environment
YOUR ROLE: Director/Lead Designer
MEDIA: 3D Modelling
SOFTWARE: Unreal Engine 5
CLASS: Virtual Production
PROFESSOR: Gregg Perkins
SEMESTER / TERM: FA 24
INSTITUTION: University of Tampa
DESCRIPTION: This project, technically my final project for Virtual Production, was a seasonal extra credit assignment and one I did for fun. As the name and timing imply, the goal was to create one last realistic space that you'd find inside a snowglobe. So for this project, I opted to pick the opposite of a traditional snowy environment and went with a desert; one set in old frontier times at that. Like the above spaces, I found prop backs for Western and canyon models I could use to decorate the scene, focusing more on the latter. I knew I wanted a rocky cliff side surrounded by rocks with minimal plants that a small camp could sit in the middle of, which would have the most variety of props. To build out that cliff side, I used the largest models of the canyon prop pack to roughly block out the curve I wanted, then filled it in with smaller rocks. A lot of these rocks I scaled and rotated in order to fill in the spaces between the larger models that didn't quite line up, giving a clean profile overall. I used a similar method for the ground itself, placing down rocky ground models and scaling them to add plenty of variety between each other. Occasionally I would put separate rock and boulder models in to further diversify the scene, and scatter plants to make it feel more varied; both in color and design. Unfortunately I could not find nor make an adequate snow globe to actually house the environment, but I'm still immensely proud of the build that I managed to create.


TITLE: Unreal Engine 5 Sequence
YOUR ROLE: Director/Lead Animator
MEDIA: 3D Animation
SOFTWARE: Unreal Engine 5
DURATION: 0:58
CLASS: Animation for Interactivity and Games
PROFESSOR: Stephen Dinehart
SEMESTER / TERM: FA 23
INSTITUTION: University of Tampa
DESCRIPTION: During my Interactivity for Games and Animation course, Epic Games released a series of video tutorials as part of an Unreal Engine Fellowship, which saw my professor introduce us to these videos and how to animate a sequence in the game engine. This sequence is the final, polished version to come out of me learning how to create, animate and render a sequence in Unreal Engine 5, with the original assignment being to create 3 sequences with 3 scenes each; although I got approval to instead do 1 sequence with 9 scenes in total. I used this to create a story and try out various aspects of the engine, from swapping camera angels to animating control rigs to accessing models via the content browser. In the end, it’s a sequence that I think serves as a nice introduction to Unreal Engine 5, and a nice starting point for me to look back on in the future.
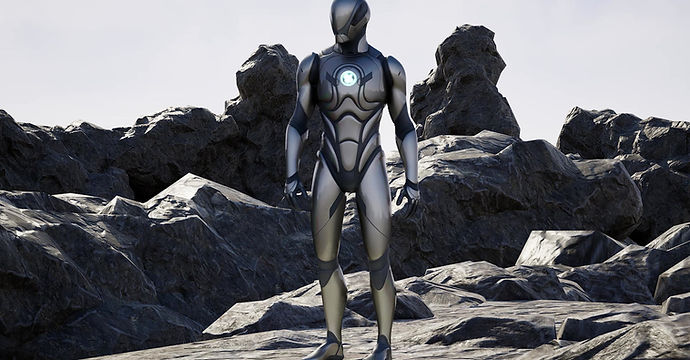
TITLE: FMX-217-1 3D Animation
YOUR ROLE: Director/Modeller/Lead Animator
MEDIA: 3D Animation
SOFTWARE: Autodesk Maya
DURATION: 0:53
CLASS: 3D Animation II
PROFESSOR: Marcio Goncalves
SEMESTER / TERM: SP 23
INSTITUTION: University of Tampa
DESCRIPTION: This compilation consists of my two major projects throughout my 3D Animation course, being my Midterm and Final projects. My midterm consisted of us taking an item and modelling it in Maya, which in my case was an Energy Sword from the video game Halo; complete with the blade itself. My actual final consisted of me modelling, rigging and animating both a walk cycle and another action being done by a character, which I decided to be a robot of my own design. Modelling the robot was rather straight forward as I used smoothed shapes to mimic the rough humanoid appearance of the machine, while using more basic shapes for the joints across his body. Rigging was similarly easy thanks to my design being incredibly close to the basic humanoid rig, although I had to modify the distortion maps on it so that when I moved the limbs, the segments past the joints would not stretch as if glued to the segments above the joints, like the elbows and knees.
